Wednesday, March 21, 2012

It's Time For Easter Dresses Already!

I received a very specific order a couple of weeks ago.  My client saw a super cute picture on my friend, Amanda's etsy shop.  Amanda is writing tutorials now and has little time to sew custom orders, so she sent her my way!!  I loved the dress too, so I was so excited to get the order. 

It took a little time to find the specific fabric, but I did indeed find everything that was identical to Amanda's design.  After a few rounds of illnesses in our household I was finally able to finish!

It's a halter top dress with a sash and a double skirt!  So pretty!


And of course I {had to} make a cute hair bow!


This one is a little larger for the older daughter...

And this one is a little smaller for the younger daughter...

So pretty! 

And I'm sure everyone knows about the beautiful weather Chicago is having right now.  Yes, those are blossoms on our Pear Tree!  Fantastic!

Saturday, January 28, 2012

It's Valentine's Day Baby. Almost Anyway.

I've had these Styrofoam cones since my little sister's baby Sip and See party (postpartum baby shower) and I hadn't been able to figure out what to do with them, since they weren't used at the party. 

I knew I wanted to do some decorating for Valentine's Day and so I went on my Pinterest search.  However, there are very few ideas on "valentine's day tree".  So, I made up my own.

I'm not used to posting tutorials on what I make, so please bear with my photographic skills.
{or lack thereof}

I decided to make a rosette tree with scraps of fabric from various projects.  I also had some super cute shimmer beaded sewing pins and others with teeny hearts on them!  Perfect!

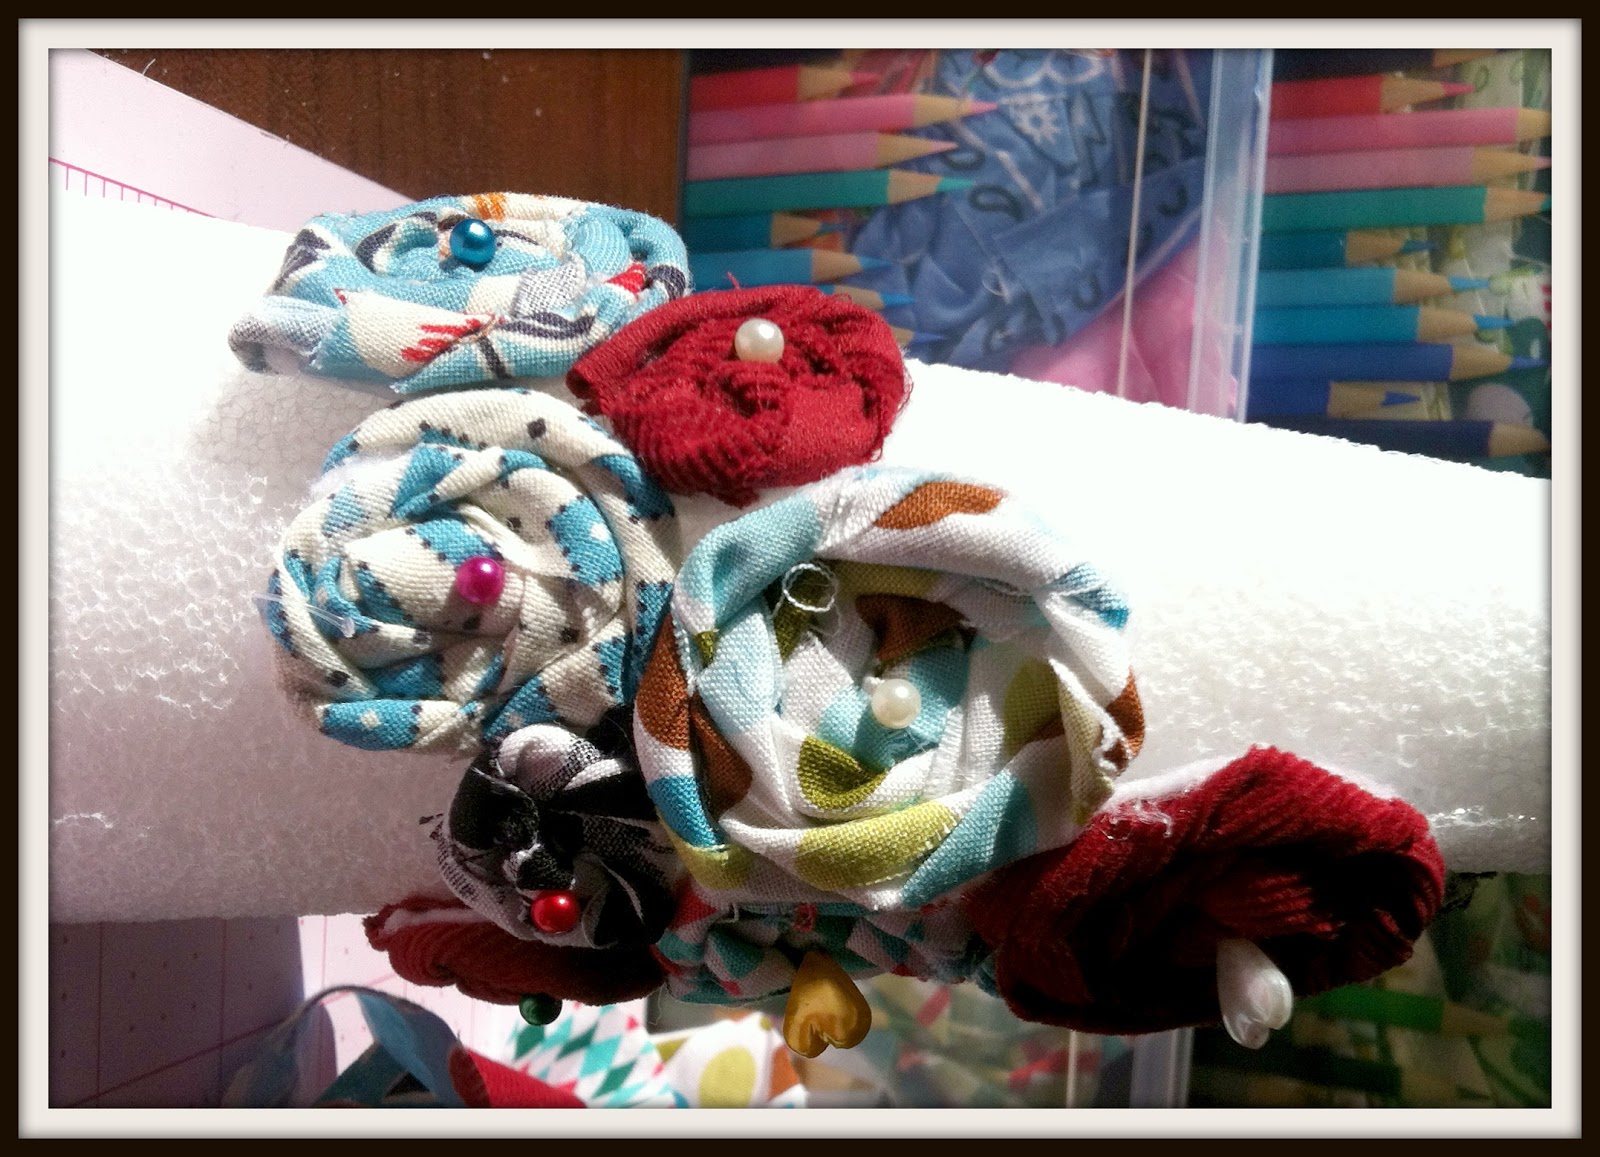
I KNOW I pinned a great tutorial on how to make these fabric rosettes, but alas I can not find it.  I will try to explain the process with the pictures I took...


First I cut a gazillion circles out of white felt.  Ok, not that many, but a lot!

Then a bunch of 1-1 1/2 inch strips of fabric.  Various lengths.  Just think, the longer they are the bigger the rosette.  Think of the scale of your project.  My cones are like mini cones, so I opted for small rosettes.

Tie a know at the end of a strip.  I found it easier to fold the strip in half, right sides out, in order to make it easier when the twisting part came.

Get ready to twist!  Put a dab of hot glue in the middle of your felt circle.  Then glue your knot down.  You will be twisting the fabric around the knot and gluing at short intervals to keep the fabric down.

See, glue.

Keep twisting!

This is a fairly loose twist.  I tried to do some loose, and some tight to add another level of texture to the trees.  This picture is showing you the end of the fabric.  I trimmed the felt so it wasn't visible, and the fabric will be then glued to the back.

Dot of glue to secure the fabric to the back of the rosette.


Aren't these pearled sewing pins cute??  I used them to secure the rosette to the cone!


Look at those pin heads!  I love the heart ones I scattered in there!

Apparently in April when Picnik closes I will be upgrading {in a big way} to Photoshop.  I have more pictures that are all sideways and for the life of me can not get them to upload to blogger the correct way.  So I apologize, but if you will go along with me here and just turn your heads a bit and use a little imagination, you might be able to see the cone.  Here we go!


I let my older two children select the fabrics I used.  The one in front is the little man's and the one behind is the little lady's.  Yes, the one in front is not totally finished.  I just ran out of glue sticks.  But a quick trip to the craft store was all I needed to get them done!

Next, I worked on the banner!  I saw an awesome tutorial on Pinterest that showed how to make felt hearts.  It was so easy!!!  And even though mine look a little lanky, I think they turned out really nice.  My felt was just left over fabric from Christmas, and in the tutorial, they use the very thick kind.  So that is why mine look wimpy!  I also wanted the "be mine" burlap bunting to be incorporated in the banner, so I cut some 6 in triangles and the letters and bee on my Cricut.  I used some pink embroidery floss to connect the hearts, then to tie a bow to connect the burlap.  My daughter says, "It is just beautiful Mommy".  So even if it isn't perfect...and it might not be repinned a hundred times, my daughter loves it and I couldn't ask for more than that!


 And because the littlest of the three munchkins loves bees, we added a bee to the bunting.


 Happy Valentine's Day!


Tuesday, January 24, 2012

It was a bug.

It was a bug. 

Okay, so I haven't been sick for the last month and a half.  And we did not have an infestation.  I caught the "I'm too busy to do anything creative" bug.  But now that I have a few minutes of PEACE while the baby is sleeping, the men are finishing a job in the basement and the pre-schooler is at a play date... I can finally write.  And it feels good.

This past month I've been reflecting on how addictive the crafting world can be.  I started off wanting to sew my daughter's clothing, because let's admit it the clothing for 7 year olds is for the most part not appropriate.  And we just can't dish out hundreds of dollars to pay for the nice stuff that is.  But once I started I couldn't stop there!  The boys needed cool stuff too!  And then the Esty shop came.  Facebook came.  The blog came.  PINTEREST TOOK OVER.  {haha, I <3 you Pinterest}  And I did a craft show!  I was overwhelmed with the information I was finding and I wanted to DO it all.  And be the best.  Well, we can't have our cake and eat it too after all {in this case}.  I had to give something up.  I took a break on crafting and my kids seem happier.  I took a break from my Etsy shop and I felt like I was breathing easier. 

 But now that the holidays are over, I have more time! 

So HELLO Pinterest crafts!  I'm back!

I found the cutest bag at Pottery Barn for Valentines mail. 

PBK mail chair backer


So cute, right?

I had a ton of extra felt from Christmas, and some white ricrack and some left over cardstock (because I'm not THAT crazy to applique the letters on a bag that will be used ONE day a year) and I got to work on my version.

At first, I was just seeing if I could figure out how to make the thing.  But after I sewed one panel together, I realized it was going to be pretty easy.  I finished with what was a pretty cute chair backer mail bag...


Then I looked up at the Pottery Barn photo again.  Sigh.  It was a mail bag, but not like that super duper one from PBK.  Well, let's bring in the ricrack and cardstock and see what we can do...


Alright, not shabby at all!  But then I again looked up at the other picture.  Wait!  There's a mail slot on the top!  That's genius!!!


Well, now you have it.  A little bit of time sewing.  A little bit of time thinking.  A little bit of time resewing and rethinking and there it is.  My first mail bag for Valentine's Day.  The first grader was giddy when I showed it to her.  {almost as much as her mama was!}

So then my pre-schooler asked where his was.  Oh boy.  Here we go again.  He doesn't like hearts you know.  So I had to come up with another plan.  A stamp works, right?  I mean it is for mail isn't it?


And seriously, how cute is that envelope?


Yeah, it's safe to say I'm back.  I will try {really really hard} to remember to update my blog more often!  There are some really great ideas out there! 


These bags and envelopes are for sale in my Etsy shop right now!

Friday, December 9, 2011

Happy Holiday's

I finished my daughter's Christmas dress yesterday and really needed to take pictures of the kids in their Christmas clothing to add to our card this year.  We had pictures taken by Carrianne Photography this fall for the card, but my hubby thought it would be more festive if there was just one picture of the kids in their holiday garb.  SO, that meant a lot of quick sewing and picture taking and a LOT of help from my wonderful sister Cathy.  She is a designer.  A fabulous designer.  Who at midnight last night was working on designing my Christmas cards because I waited too long and they need to be done quickly or else they will be New Year's cards.  {ha} 
I know this doesn't surprise any of you who follow my blog. 

Back to the cards.  How fantastic is this design!


Cathy recently opened up an etsy store, so please take a moment to check her out.  She {obviously} designs greeting cards, but also does a range of invitations and if you check out her shop you will see a few examples of wedding invitations and save the dates.  She is so sweet and won't rest until she gets exactly what you want.  I know this because she was emailing me at one in the morning.  Love you sis!


Playing Catch Up!!!

Yes, it really has been now "months" since I last wrote.  November was one hectic month!!!  My eldest turned 7, my youngest turned the big 1 and my sisters and I threw a baby shower for our other sister.  Plus I never posted pictures from Halloween!  So this is going to be my 'catch up' entry!

First off, Halloween.  So Briana got home from school on Halloween to tell me she forgot her owl mask at school.  Of course.  So I took some scraps and glued them to a ear muff head band and I actually liked it better than the fancy feather one!!

Charlie Brown and his little Owl friend

I didn't make the Buzz costume because my middle child is super easy going and wanted to wear last year's costume!

cheeeeeeeese

just because he is so cute.  yes, I made him. 

Moving forward, Briana's birthday was next.  We decided to continue the owl theme and do owl invitations, and under the stars themed snack bar and a sleep under pajama dress up party!  It was great fun.  {and I totally deserved the glass of wine after my sisters deserted me with 16 screaming 6 and 7 year olds!}  But before they left me (it's okay, I would have done the same thing to them!) they helped me set up and try to keep the girls entertained and playing nicely together.  Beth *from Beth Kruse Custom Creations* made Briana's "7" banner and helped me set up the snack bar and Cathy was in charge of organizing, taping, sibling corralling and whatever else I could throw at her!

Snack Bar

Owl Banner

Popcorn and Candy section {BIG hit!}

Cookie Dough Dips

Briana's cake


The following weekend was my youngest birthday party!  Talk about being over booked.  But I got through it, again with the help of my dear family!! 

Charlie loves bees.  He had one in his baby mobile and has just been obsessed ever since.  So his first birthday party HAD to be bee themed!! 

Again, it was only 'treats' on the table, but it was okay being in the afternoon.  I made the bunting banner for his highchair with left over material from the '1' shirt I made for him!  The all the food was yellow and white {and some black} and I made streamers with ribbon and circle and oval cut outs from my Cricut.  Beth made the '1st Bee Day' banner that is also featured in Charlie's cake smash professional prints by Carrianne Photography.


Buzz.  Vanilla wafer cookies


Beth designed these bees to mimic the bees on Charlie's walls!


brownie, marshmallow and wafer cookie skewers


Lemon mousse cups with cool whip


Charlie's smash cake


I even tried to make bee cake pops.  Not perfect, but cute!


I loved this party!


Charlie sign currently resides in Charlie's room!


This will be used the following week for his photography pictures!


Up close view at the bunting banner Beth made


I loved making these! Charlie's month by month pictures framed on "onesie" paper and hung by cloths pins on jute


He has no idea what cake is....


...thinking....


...yea, that's the stuff!

Smash Cake Photos.  Yes, they are awesome.  Some work went into them, but I am so so so happy with the results!  I brought a few things you've seen from the birthday pictures so I will keep it short.  He wore his number 1 shirt and the hat I made for his Charlie Brown costume for some of the pictures.  And Beth's bunting banner was featured in the background of others.  I made all Charlie's cakes because of his allergies but that worked better because I actually like how the 'bee hive' appearance turned out!


I recommend Carrianne to anyone in the Lake County (Illinois) area.  She is a phenomenal photographer and she is amazing with children.  I have been blessed to have four shoots with her in the year I've known about her and I have to say I shouldn't be surprised by how many wonderful shots she takes, but I always am when I get my CD!  Thank you Carrianne for being so awesome!!!!

Last but not least, we have Sarah's baby shower. 

Sarah is an avid gardener.  She loves nothing more than being outside planting and pruning...well maybe her puppies.  Oh, and she is pregnant, so I'm sure the babe will fit in there too!  {hehe}

So of course we did a Garden theme!  There were cupcakes that looked like mushrooms, a garden of peas and carrots (on top of cupcakes), fresh fruit, doughnut holes that looked like acorns, cake balls that looked like heads of lettuce and potatoes.... So much more!  I also made cakes to go in the mason jars that are on the table.  Beth took care of all the arranging, artwork and designs and I helped her by baking.  We are a good team!  Cathy made these awesome candles out of artichokes and asparagus.  I am so proud to be a "Stoeckel" and a part of the creativity that went into this day!!!


Our Garden Veggies

Fresh raspberries in November!  How exciting!

Mushroom cupcake and mini pies

a variety of cakes in little mason jars

The acorn doughnuts

Pie Pops!

Beth's center pieces are beautiful!

Cathy's fresh veggie candles were really cute too!


And here is Sarah.  Such a beautiful expectant mother!

My little one giving her little one a hug

Beth's girls giving baby Owen some love

This is my sister Beth.  She never has pictures of herself in her blog! 

My children and their aunt.

What a great month November was!  December has been full of sewing projects and Christmas decorating, so maybe by February I will have another post.  {smirk}